Home » Uncategories » Diy Rolling Clamp Rack / Ultimate Mobile Clamp Rack 18 Steps With Pictures Instructables : Add divider blocks to diy pipe clamp rack use a square to draw a line across the board about 1 ⅜″ from the outside block and line up the next divider block along this line.
Diy Rolling Clamp Rack / Ultimate Mobile Clamp Rack 18 Steps With Pictures Instructables : Add divider blocks to diy pipe clamp rack use a square to draw a line across the board about 1 ⅜″ from the outside block and line up the next divider block along this line.
Diy Rolling Clamp Rack / Ultimate Mobile Clamp Rack 18 Steps With Pictures Instructables : Add divider blocks to diy pipe clamp rack use a square to draw a line across the board about 1 ⅜″ from the outside block and line up the next divider block along this line.. Clamp in place, predrill and drive screws from the back side to attach in place. Your sizes don't have to be exactly the same as mine, but the length of the front runner and. I also made a top to it so i can use the upper shelf for some added storage. And at around the 10 minute mark, you'll see a video shot of the clamp rack in the old shop. So, as you get more clamps you can quickly add more rack space.
An additional groove along the length of the rack allows that rod to stay in place and prevent accidental falls when manipulating the neighbouring clamps. That saves miles of walking back and forth to the clamp rack. Use a clamp to place a scrap piece of plywood right against the centerline. It will also hold 12 bar clamps stacked 6 deep in 2 bays. Clamp in place, predrill and drive screws from the back side to attach in place.
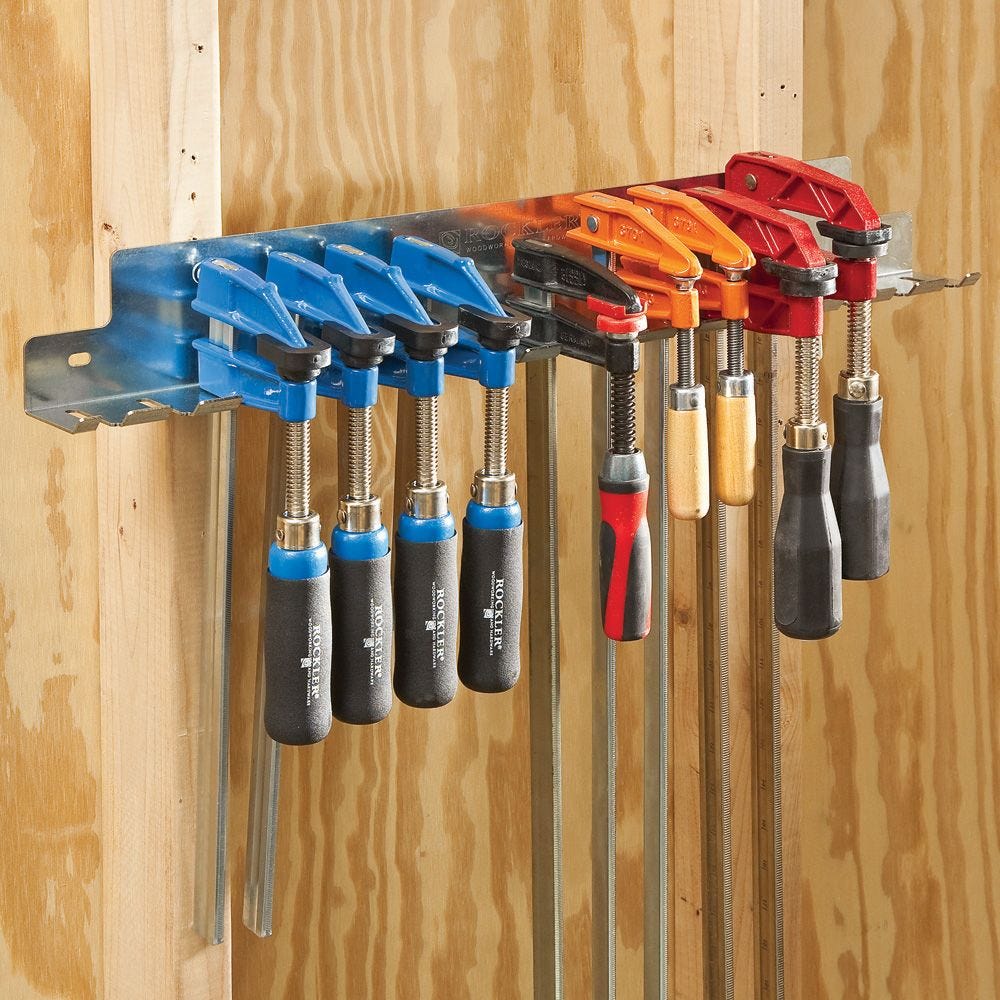
F Style Clamp Rack Rockler Woodworking Tools from www.rockler.com Use a clamp to place a scrap piece of plywood right against the centerline. Clamp in place, predrill and drive screws from the back side to attach in place. Without the slots, you'd have to tighten the jaws to hold a clamp in place, and then loosen the jaws when you want to remove the clamp from the holder. For this diy clamp rack, you will need: No need for anything fancy here. How to build an affordable clothing rack with piping. It's very handy having a roll of each in the shop to protect surfaces from getting gunked up due to painting, finishing or glue up. The construction on this is very simply and could be done.
I also made a top to it so i can use the upper shelf for some added storage.
It's very handy having a roll of each in the shop to protect surfaces from getting gunked up due to painting, finishing or glue up. One sheet of plywood makes an easy woodworking project in the form of a pretty handy rolling clamp cart in a small footprint.read more, with links to the nyw. Since i had some sentimental attachment to it, i decided to figure out a way to make it work for me a little longer. Their back panels span two wall studs for strength, and the pair will shelve upwards of 80 or more clamps. So, as you get more clamps you can quickly add more rack space. The construction on this is very simply and could be done. All parts are made from 3/4 plywood. Without the slots, you'd have to tighten the jaws to hold a clamp in place, and then loosen the jaws when you want to remove the clamp from the holder. It holds about 50 clamps, takes up a little more than four square feet of floor space and can honestly be built in an afternoon. And at around the 10 minute mark, you'll see a video shot of the clamp rack in the old shop. Add divider blocks to diy pipe clamp rack use a square to draw a line across the board about 1 ⅜″ from the outside block and line up the next divider block along this line. Diy rolling clamp rack : Then allow it to completely dry overnight before doing the final steps.
Diy rolling clamp rack / diy is all the rage these days, and due to the countless online sources, it becomes difficult to find reliable. I glue station takes up one side of the rack, but the other is still blank so i added on a cleat so that when i'm not using the glue up rack, i can store it on the clamp rack itself. Now for all my other clamps, i use a simple rack made from various piece of cheap construction lumber. It holds every type of clamp in one compact space, and you can wheel it right up to your work area. There's an old saying that a woodworker can never have too many clamps.
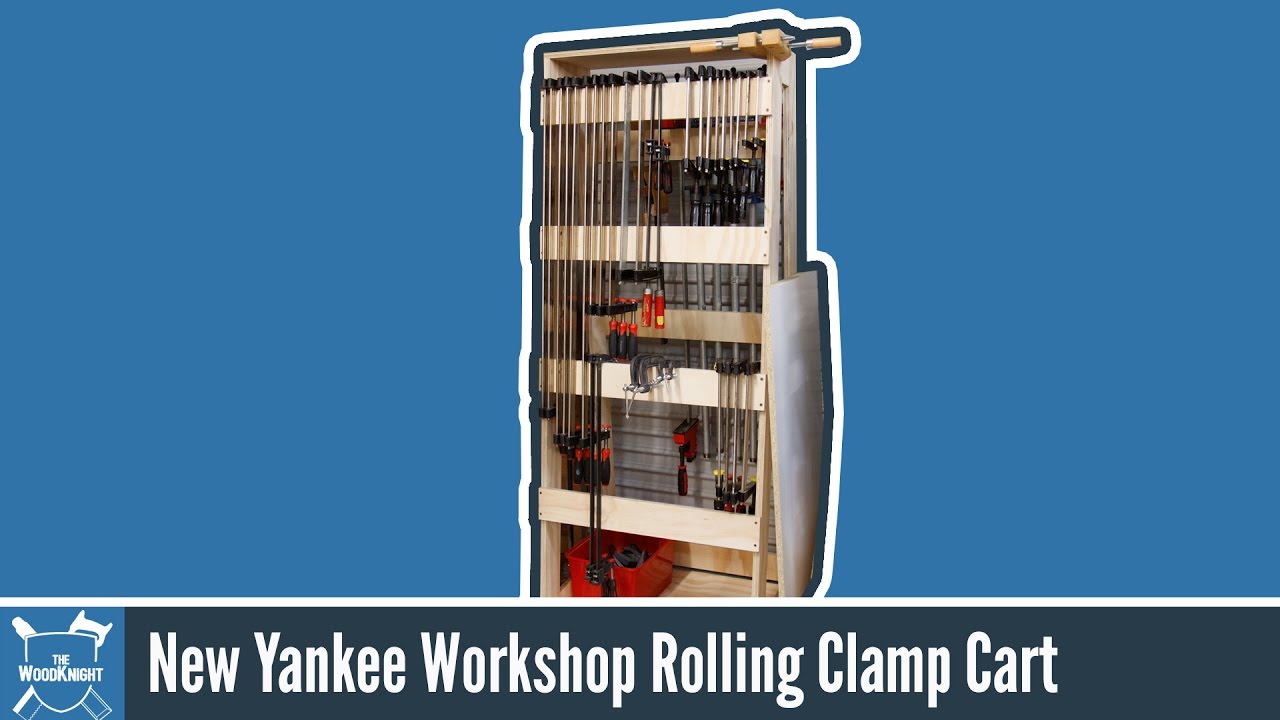
How To Make A Rolling Clamp Rack New Yankee Workshop Youtube from i.ytimg.com A simple google search renders a ton of clamp rack storage solutions, but i wanted quick, easy, and free. It holds every type of clamp in one compact space, and you can wheel it right up to your work area. Diy rolling plywood lumber storage cart with clamp rack pages public figure video creator diy & crafts videos diy rolling plywood lumber storage cart with clamp rack Honestly, i believe the final product truly is the ultimate clamp cart! The new rack is made out of birch plywood. That clamp rack had served me well for almost 20 years, but i was outgrowing it. For that task it was a success. Borrowing this idea for my rolling clamp cart.
Without the slots, you'd have to tighten the jaws to hold a clamp in place, and then loosen the jaws when you want to remove the clamp from the holder.
How to build an affordable clothing rack with piping. And at around the 10 minute mark, you'll see a video shot of the clamp rack in the old shop. These compact but capacious racks will keep your clamps orderly, and all you need is one 4 x 8 sheet of plywood to make them both. Now for all my other clamps, i use a simple rack made from various piece of cheap construction lumber. I also made a top to it so i can use the upper shelf for some added storage. Without the slots, you'd have to tighten the jaws to hold a clamp in place, and then loosen the jaws when you want to remove the clamp from the holder. If you used the side by side method you'd need 48 just for the parallels alone! As my clamp collection steadily grows, i'm realizing that i need a dedicated place to store and organize all of them. It's very handy having a roll of each in the shop to protect surfaces from getting gunked up due to painting, finishing or glue up. Use a clamp to place a scrap piece of plywood right against the centerline. They were just laying all over the floor and i could have that. What i came up with was adding drawers into the space between the two racks. Add divider blocks to diy pipe clamp rack use a square to draw a line across the board about 1 ⅜″ from the outside block and line up the next divider block along this line.
The first step was to cut the back and shelf pieces. These compact but capacious racks will keep your clamps orderly, and all you need is one 4 x 8 sheet of plywood to make them both. That clamp rack had served me well for almost 20 years, but i was outgrowing it. When you've got so many clamps that it's a problem getting them to where the work is being done, build this rolling clamp rack! This rack system is easy to build, and easy to add on to.
Https Encrypted Tbn0 Gstatic Com Images Q Tbn And9gctbcqnghrwq2st 4 6 F8qc19ngvagyqznlsxlderg Usqp Cau from So, as you get more clamps you can quickly add more rack space. I glue station takes up one side of the rack, but the other is still blank so i added on a cleat so that when i'm not using the glue up rack, i can store it on the clamp rack itself. That clamp rack had served me well for almost 20 years, but i was outgrowing it. To get started, i grabbed some scrap ¾″ plywood pieces to use for this project. For this diy clamp rack, you will need: Instead, i present this clamp rack design: As my clamp collection steadily grows, i'm realizing that i need a dedicated place to store and organize all of them. If you used the side by side method you'd need 48 just for the parallels alone!
As a matter of fact it was more than a success because i often had items that didn't belong on the clamp rack simply because they could fit.
Clamp in place, predrill and drive screws from the back side to attach in place. Instead, i present this clamp rack design: Without the slots, you'd have to tighten the jaws to hold a clamp in place, and then loosen the jaws when you want to remove the clamp from the holder. Your sizes don't have to be exactly the same as mine, but the length of the front runner and. In my case, i was reusing my old clamp rack so i simply based my total length off of it. But if finding space for all those clamps is becoming an issue, maybe what you need is a better way to store and organize them. To get started, i grabbed some scrap ¾″ plywood pieces to use for this project. The new rack is made out of birch plywood. An additional groove along the length of the rack allows that rod to stay in place and prevent accidental falls when manipulating the neighbouring clamps. Use a clamp to place a scrap piece of plywood right against the centerline. The construction on this is very simply and could be done. What i came up with was adding drawers into the space between the two racks. Borrowing this idea for my rolling clamp cart.
0 Response to "Diy Rolling Clamp Rack / Ultimate Mobile Clamp Rack 18 Steps With Pictures Instructables : Add divider blocks to diy pipe clamp rack use a square to draw a line across the board about 1 ⅜″ from the outside block and line up the next divider block along this line."

0 Response to "Diy Rolling Clamp Rack / Ultimate Mobile Clamp Rack 18 Steps With Pictures Instructables : Add divider blocks to diy pipe clamp rack use a square to draw a line across the board about 1 ⅜″ from the outside block and line up the next divider block along this line."
Post a Comment